Iterating with Simplicity: Evolving a Django app with Intercooler.js
| published by | Adam Stepinski |
|---|---|
| in blog | Instawork Engineering |
| original entry | Iterating with Simplicity: Evolving a Django app with Intercooler.js |

About a year ago, Instawork started experimenting with a new product called Gigs. Gigs lets restaurants and caterers fill on-demand shifts with pre-qualified dishwashers, cooks, and servers from Instawork’s network of professionals. Our MVP was little more than a Google form to request shifts. This worked OK in the early days, but as the product took off, it became clear we needed a web dashboard for managers to view and edit their gigs.
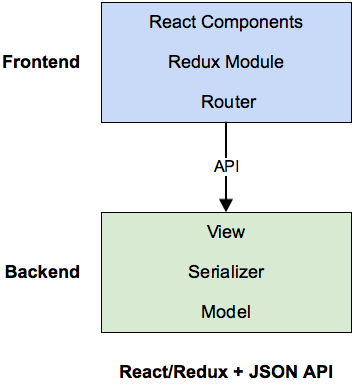
Our existing web dashboard (a hiring app for full time jobs) was built as a single-page app (SPA) using React and Redux. The SPA received data through a RESTful JSON API written in Django. This architecture enabled us to create a dynamic app with rich user interactions. It also saved time by sharing an API with our mobile apps. The abstraction boundary between the client and server helped us write modular code with a clear separation of business & presentation logic. All in all, building a SPA with React/Redux on a JSON API was the right choice for a mature, well-defined project.

However, we found ourselves questioning the SPA approach when it came time to build a dashboard for Gigs. The product was evolving quickly as we learned what worked for our businesses and professionals, so rapid development was a requirement for the project. A React/Redux SPA, with its many layers of abstractions, didn’t lend itself well to rapid iteration.
- Every new feature required separate code changes in the backend (Python) and frontend (JS) codebases.
- Abstraction necessitated code repetition, since API data needed to be represented both server-side and in the browser.
- We needed to perform extra work to ensure our API remained backwards compatible.
With our SPA architecture looking like the wrong approach for the Gigs dashboard, we turned to what Django offered out of the box.
Back to Basics with Django
Full-featured frameworks like Django or Ruby on Rails have long empowered developers to build web applications with minimal fuss. With a mature, battle-tested tool like Django, we could deliver a basic dashboard (displaying a list of gigs) in under a day. The process should sound familiar to anyone who’s worked with Django or Rails before:
We started with a simple Django model to represent gigs in our database.
# models.py
class Gig(models.Model):
    id = models.IntegerField(primary_key=True)
    created_by = models.ForeignKey(User, on_delete=models.CASCADE)
    position = models.CharField(max_length=255)
    address = models.CharField(max_length=255)
    starts_at = models.DateTimeField()
    ends_at = models.DateTimeField()
Next, we created a class-based view by extending Django’s ListView. This class provides common functionality such as template rendering, pagination helpers, queryset filtering, and more.
# views.py
class GigsList(ListView):
    paginate_by = 20
    template_name = 'gigs.html'
    def get_queryset(self):
        return Gig.objects.filter(created_by=self.request.user)
Then, we connected the view to a URL path pattern.
# urls.py
urlpatterns = [
  url(r'^dashboard/gigs/?$', GigsList.as_view(name='gigs'))
]
Finally, we defined a template to render the page (gigs.html). Note that ListView provides template context to page_obj and object_list. ListView also automatically handles pagination via the `page` query parameter.
{# gigs.html #}<h2>My Gigs</h2>
<div id="gigs">
{% include '_gigs_items.html' %}
</div>
<div class="pagination">
{% if page_obj.has_previous %}
<a href="{% url 'gigs' %}?page={{ page_obj.previous_page_number }}">Previous</a>
{% endif %}
  {% if page_obj.has_next %}
    <a href="{% url 'gigs' %}?page={{ page_obj.next_page_number }}">Next</a>
  {% endif %}
</div>
{# _gigs_items.html #}{% for gig in object_list %}
<div class="gig">
<div class="gig__title">{{ gig.title }}</div>
<div class="gig__location">{{ gig.location }}</div>
<div class="gig__time">
{{ gig.starts_at|date:"D, b d g:i A" }} -
{{ gig.ends_at|date:"g:i A" }}
</div>
</div>
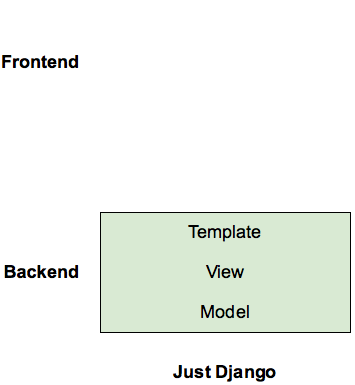
{% endfor %}Aside from CSS styling and unit tests, that’s all the code required to ship a basic Django dashboard to our users! By using Django to build a purely server-rendered web app, we completely eliminated all of the client-side layers in our architecture:

This not only allowed us to ship the first version faster, but it also enabled us to iterate quickly. New features could be done in a single codebase. Engineers could focus on developing with a single framework, instead of jumping between Python and JS. And we no longer had to worry about API compatibility, since the Django code was written for the specific page and not used in other contexts.
…But is it too basic?
I know what you’re thinking: creating a purely server-rendered web app doesn’t deliver the full experience users expect in 2018. Our dashboard was missing common features such as real-time refreshing, infinite scroll, and in-place sorting & filtering. Adding these valuable features inevitably requires the introduction of JavaScript on the client. So we considered two choices for adding JavaScript:
- Sprinkle in some JS into our server-rendered pages. We would need to add AJAX calls to custom APIs, and render UI elements on the client. Without a full JS framework, this type of code becomes hard-to-maintain spaghetti, bug-prone and tightly coupled to the server-rendered templates.
- Rewrite the app using the SPA/API architecture. A framework like React/Redux would help us write maintainable code, but we would need to throw out the current version and start from scratch. And of course, we lose the speed, simplicity, and power of Django for future iterations.
Neither option appealed to the team, so we challenged ourselves to find a better solution. Luckily, we discovered Intercooler.js, which perfectly fit our desire to “iterate with simplicity”!
Intercooler.js: Interactions without the JS
Intercooler is a client-side library that makes it easy to define AJAX requests via HTML attributes. Frameworks like React, Vue, or Angular expect AJAX requests to respond with JSON. Intercooler is different: it expects the response to be HTML that gets inserted into the page. Take this simple example:
<a ic-get-from="/hello">Hello World!</a>
By setting the ic-get-from attribute, Intercooler will make a GET request to /hello, and insert the response content into the a element. Intercooler provides many more attributes that extend the basic behavior in a few ways:
- appending or prepending content to other elements on the page
- adding/removing CSS classes to the new content, to enable smooth transitions
- showing a loading indicator while the AJAX request is in-flight
- specifying dependencies between components, to update several parts of the UI at once
- triggering an AJAX request when an element become visible.
Intercooler lets us gradually enhance our Django pages in a maintainable way, without the need for a full re-write in JavaScript. To show this in action, we’ll add Intercooler to the Django code above to replace the next/previous pagination with an infinite scroll.
Let’s start with the template (new code is in bold):
{# gigs.html #}<script src="{% static 'js/vendor/intercooler-1.2.1.min.js' %}"></script>
<h2>My Gigs</h2>
<div id="gigs">
{% include '_gigs_items.html' %}
</div>{# _gigs_items.html #}{% for gig in object_list %}
<div class="gig"
{% if forloop.last and page_obj.has_next %}
ic-trigger-on="scrolled-into-view"
ic-append-from="{% url 'gigs' %}?page={{ page_obj.next_page_number }}"
ic-target="#gigs"
{% endif %}
>
<div class="gig__title">{{ gig.title }}</div>
<div class="gig__location">{{ gig.location }}</div>
<div class="gig__time">
{{ gig.starts_at|date:"D, b d g:i A" }} -
{{ gig.ends_at|date:"g:i A" }}
</div>
</div>
{% endfor %}In gigs.html, we’ve removed the code that rendered previous and next buttons. In _gigs_items.html, we’ve added several Intercooler attributes to the last item in the list:
- ic-trigger-on tells Intercooler to make an AJAX request when the last item is scrolled into view.
- ic-append-from tells Intercooler to make an AJAX request for the next page of results, and to append the results to the target container.
- ic-target specifies the container to which the AJAX response will be appended.
{# view.html #}class GigsList(ListView):
paginate_by = 20
    def get_template_names(self):
        if int(self.request.GET.get('page')) > 1:
            return ['_gigs_items.html']
        return ['gigs.html']
    def get_queryset(self):
        return Gig.objects.filter(created_by=self.request.user)
In the view, we replace the static template (gigs.html) with the method get_template_names. On the first page of gigs, we want to render the full page. For subsequent pages, we want to render just the div containers to append for the infinite scroll.
That’s all it takes! Let’s review what happens when a user loads and scrolls the page:
- When a user visits /gigs, we load the full page with the first 20 gigs.
- When the user scrolls to the bottom of the page, Intercooler will trigger an AJAX request to /gigs?page=2.
- The server will respond with a rendering of _gigs_items.html: just the div elements without the rest of the page content.
- Intercooler will append the div elements to the #gigs container.
One easy enhancement we can make is to show a spinner when the user reaches the end of the list, before the new items load. This change can be made purely in the template:
{# gigs.html #}<script src="{% static 'js/vendor/intercooler-1.2.1.min.js' %}"></script>
<h2>My Gigs</h2>
<div id="gigs">
{% include '_gigs_items.html' %}
</div>
<img id="spinner" src="/static/spinner.gif" style="display:none">{# _gigs_items.html #}{% for gig in object_list %}
<div class="gig"
{% if forloop.last and page_obj.has_next %}
ic-trigger-on="scrolled-into-view"
ic-append-from="{% url 'gigs' %}?page={{ page_obj.next_page_number }}"
ic-target="#gigs"
ic-indicator="#spinner"
{% endif %}
>
<div class="gig__title">{{ gig.title }}</div>
<div class="gig__location">{{ gig.location }}</div>
<div class="gig__time">
{{ gig.starts_at|date:"D, b d g:i A" }} -
{{ gig.ends_at|date:"g:i A" }}
</div>
</div>
{% endfor %}All we need to do is add a hidden spinner element to the main template, and then add an ic-indicator attributes to the last item in the list. This tells Intercooler to show #spinner while waiting for a response from the AJAX request, and hide it when the request completes.
Iterating with Simplicity

We came away from this development experience with some insights that have had a profound effect on how we build software at Instawork:
- It’s important to use a tech stack that matches the needs of the project. A SPA/API approach can work well for mature projects, but it would’ve been the wrong fit for an immature, rapidly evolving product.
- Server-rendered pages are a good fit for fast iteration, due to the power of frameworks like Django, and a limited stack of technologies and abstractions.
- Intercooler.js allowed us to evolve our server-rendered pages to have rich, SPA-like features without needing to do adopt a new architecture and do a full re-write.
A core tenet of the Instawork engineering team is to “Iterate with Simplicity”. We strive to deliver a good product quickly, learn from user feedback, and make small continuous improvements until we have something great. The combination of Django and Intercooler has allowed us to double down on this process, to the benefit of our users and company.
What’s Next?
We’ve been so impressed with the level of productivity of Django + Intercooler that we’ve adopted it as our primary tool for web development. But since our engineering team works on both web and mobile, we started noticing a stark contrast between our productivity on the two platforms. Which got us thinking: why can’t mobile development feel as fast and easy as web development with Django & Intercooler?
We did more than just think about it, we actually built a framework to enable “iterating with simplicity” in our mobile apps. Stay tuned for more about our solution soon!
Update: We’re happy to announce the open sourcing of Hyperview, our server-driven mobile app framework. Hyperview takes inspiration from Intercooler and allows us to write native mobile apps the same way we write web apps. Check out the blog announcement or the Hyperview website: https://hyperview.org
Iterating with Simplicity: Evolving a Django app with Intercooler.js was originally published in Instawork Engineering on Medium, where people are continuing the conversation by highlighting and responding to this story.